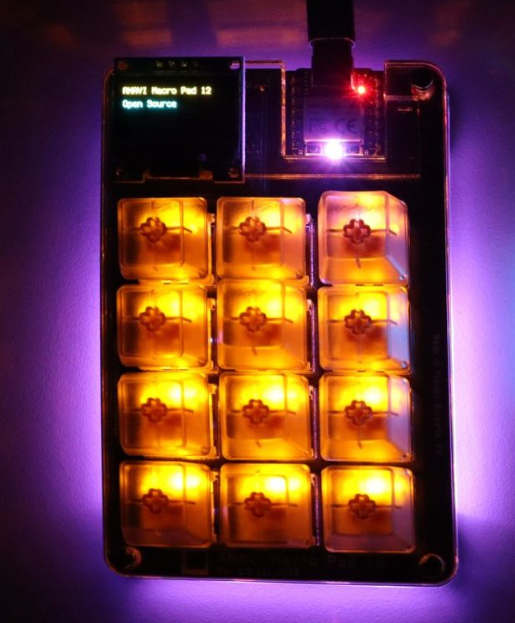
ANAVI Technology has launched two more open-source hardware mechanical keyboards based on the Raspberry Pi RP2040 microcontroller, equipped with an OLED display, and programmable with CircuitPython: the ANAVI Macro Pad 12 with 12 keys and the ANAVI Arrows with four keys and a rotary encoder.
- YouTube Intro
- CNX post
- Order one, forget you did that, and later in life you'll be pleasantly surprised when this shows up in the mail!
ANAVI Macro Pad 12 Specifications:
- MCU module – Seeed Studio XIAO RP2040 with Raspberry Pi RP2040 dual-core Cortex-M0+ microcontroller @ up to 133 Mhz with 264KB SRAM, 2MB SPI flash, USB Type-C port
- Keys – 12x Gateron red, linear, non-clicky mechanical switches and transparent keycaps with yellow LED backlighting
- Display – OLED display connected to I2C slot (can be replaced with another I2C module)
- Host interface – USB Type-C port from the XIAO RP2040 module
- Misc – RGB LED for each key on top, 6x WS2812B addressable LEDs for bottom-lighting
- Dimensions – 116.7 x 73.0 mm

Getting started
- Get the box. Unbox things and look at all the parts!
- Look at website: https://anavi.technology/
- RTFM on GitHub
- Assembly
- peel off protective films from Acrylic Enclosure
- Assemble the Acrylic Enclosure (4 M3 screws and 8M3 nuts)
- 4 screws up through solid bottom plate, fasten with 4 m3 nuts
- place PCB on bottom plate with knob facing away from bottom and pass screws through holes
- add U-shaped acrylic spacer plate
- place top acrylic part and then gently fasten it with 4 M3 nuts.
- Wonder about the design a bit and then continue on
- Insert the keycaps.
- Add the display
- Wonder at how great you are at putting things together
- Plug it into your desktop with a USB-C cable and boom - an E: CIRCUITPY pops up!
- Configuration
- KMKFW.io preloaded.. but it also supports QMK firmware.
The default configuration came with it doing this:
Default: LED Display:
ANAVI Macro Pad 12

Open Source
Default Keybindings:
| 0 | a | b |
|---|---|---|
| 7 | 8 | 9 |
| 4 | 5 | 6 |
| 1 | 2 | 3 |
So now what?
Open that code.py file and look at it. Notice that when you open with VS Code it triggers the device to do a reload.
The key code bits that control that default behavior are in the code.py in two sections:
oled_ext = Oled(
    OledData(
        corner_one={0: OledReactionType.STATIC, 1: ['ANAVI Macro Pad 12']},
        corner_two={0: OledReactionType.STATIC, 1: [' ']},
        corner_three={0: OledReactionType.STATIC, 1: ['Open Source']},
        corner_four={0: OledReactionType.STATIC, 1: [' ']},
    ),
    oWidth=128,
    oHeight=64,
    toDisplay=OledDisplayMode.TXT,
    flip=False,
)
keyboard.extensions.append(oled_ext)

## then later on it has this section

# Matrix 4x3 keymap, 12 keys in total

keyboard.keymap = [

    [

        KC.N1,

        KC.N2,

        KC.N3,

        KC.N4,

        KC.N5,

        KC.N6,

        KC.N7,

        KC.N8,

        KC.N9,

        KC.N0,

        KC.A,

        KC.B,

    ]

]
Doesn't make much sense at first where you got o change key bindings or other behavior.
The device comes with KMK which is written in CircuitPython. Their Getting Started Guide might help.
What I did: Open E: in VSCode, initialize Git, start hacking with a tiny hint of safety.